 Deck Box
 Patio Chair
 Patio Bar Table
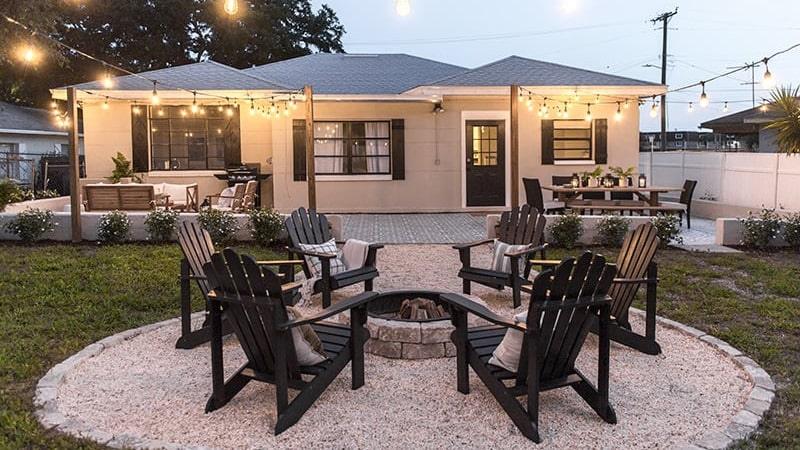
Have you ever thought about investing in a gas fire pit? Investing in a large (or small) gas fire pit for your property has countless amazing benefits. However, finding the best gas fire pit is no easy feat; you want to consider making your own DIY natural gas fire pit instead. Fortunately, no matter what you may have struggled with in your life, building a DIY gas fire pit can be an excellent way to rest, relax, and calm down. So, with this in mind, we’ve outlined some key things you need to know to help you learn how to build a gas fire pit accordingly.
Getting Started with Building a Fire Pit
So, you want to make your own gas fire pit use in your home. If this sounds like your case, learning how to build a gas fire pit could be incredibly valuable, and this may influence your final decision as to the best gas fire pit online accordingly. Why leave this to chance?
What You’ll Need
Before we go any further, we’ll first need to outline some of the main things you’ll need to make your very own gas fire pit. After all, a gas fire pit is more than just a pile of dry twigs and kindling on the floor! Therefore, some of the different tools you will need to make your DIY gas fire pit include the following. For the purposes of this guide, we’ll be focusing on how to make a concrete stone gas fire pit.
-
Concrete hardscape blocks and dividers (to create the structure)
-
Masonry adhesive – exterior grade adhesive is ideal
-
Filler materials for your fire pit, depending on your design (we recommend lava rocks)
-
Ignition systems (we recommend automatic ignition systems, as these are considered the safest and most convenient option for most users)
-
Fire pit bowl
-
Burner pan
-
Spray paint (to mark the location)
These are just some of the main tools you’ll need for your gas fire pit. Don’t forget, though – every gas fire pit is unique. So, feel free to customize your fit pit with anything that takes your fancy, aesthetically speaking. However, it’s worth considering here that building an ignition system yourself is challenging – so if you’re unsure, always hire a gas professional to add the finishing touches to your fire pit.

Choosing Your Ideal Location
So, you’ve gathered everything you’ll need. Now, it’s time to choose the ideal location. The best solution in this regard is usually to choose somewhere that’s well-ventilated and airy, at least twenty feet from your property (to reduce the risk of a fire spreading). Ideally, it should be even further, if possible.
A suitable location should also be free of trees, debris, hedging, and the like, all of which could potentially catch fire if the flames grew in size.
While the ideal location is important to prevent fire from spreading, you should always still keep protection with you when using your fire pit. Ensure your fire pit is surrounded by non-flammable materials for any falling embers. Try to keep water or fire extinguishers alongside as necessary, just in case.
Of course, comfort is also worth considering when talking about the best location for your DIY outdoor / in-ground gas fire pit. The location should be one that you can enjoy happily. When choosing a location, try to imagine how it will feel once you have the fire pit in place. The location should be somewhere dry, warm, and where you feel safe. Don’t put your new outdoor round or square gas fire pit in the middle of your garden if you find the shadowed edges of your garden spooky!
Fuel Type Preference
Another factor you will need to consider when creating an outdoor fire pit is your fire type preference. We typically tend to think of a DIY outdoor fire pit as being powered by wood only.
However, this isn’t the case. Actually, there are numerous different types of fuel that you could use, which include the following options:
-
Natural seasoned wood (the most common, classic fuel for fire pits needing good heat)
-
Kiln-dried wood (a great alternative to seasoned wood that typically burns slightly hotter)
-
Charcoal (lightweight residue from burning wood – still highly flammable!)
-
Propane (a cooler, sophisticated, and easy-burning material for a DIY propane fire pit)
-
Ethanol (an alternative to propane that’s natural, clean-burning, and relatively cool)
Your choice of fuel will significantly impact how you choose to make your DIY outdoor fire pit. For example, a wood-burning fire pit will need a large internal surface area for combustion. Meanwhile, propane and ethanol (biofuel) burners may instead need a watertight tray since these liquids cannot simply be stacked.
Fire Pit Shape, Style, And Design
Once you know about the optimal choice of location and fuel, you can begin looking at the main differences between shape, style, and design. We’ve outlined a few things that may help in this regard as follows.
Size
Size is one of the most crucial aspects of your fire pit shape, style, and design planning. If you’re making a DIY portable gas fire pit, you’ll naturally want to opt for a much lightweight, more easy to carry design. However, you should always ensure your new burner is suitably large to 1) hold plenty of fuel and 2) release any accumulated smoke without a release for which your unit could explode from the high pressure levels.
Shape
Did you know that fire pits come in many different shapes? Circular and square fire pits are among the most common; square fire pits offer a clean-cut and pleasant design. Still, circular fire pits offer consistent warmth around the entirety of the fire pit (due to circles having the same radius in every direction).
Portability
Another common question is whether your new design should be a permanent or portable gas fire pit. Permanent gas fire pits tend to be larger, but they aren’t movable. A temporary small gas fire pit might be perfect if you need a solution that’s easy to get in place when you need it.
If you’re feeling a little bit unsure about the benefits of different styles, please contact our experts today to see how w can help!
A Slow Process
It’s important to keep in mind when creating your DIY outdoor fire pit that it’s a very slow process. It’ll be worth it in the end, of course. Still, making a fire pit involves a lot of complex processes and steps. As a result of this, you should always prepare to dedicate plenty of time to your creating process unless you already happen to be experienced with creating fire pits or similar structures.
5 Simple Steps to Create a DIY Home Fire Pit
In order to make a DIY gas, wood, or propane fire pit for your home, you’ll need to come up with a simple design, to begin with.
At a minimum, your DIY gas fire pit should include:
-
a recessed well (to hold your chosen type of combustion material)
-
a non-combustible surrounding platform (to prevent the flames from spreading)
-
a strong insulating material to surround the fire pit (to prevent burns to the touch)
The easiest way to create your fire pit is simply to invest in a Fire Pit Bowl Pro, which can easily attach to a propane gas canister. When installed in your fit pit, it gives the same stunning style as a standard fire pit (without as significant a level of risk).
However, you can attempt to create your own ignition system, as we will briefly cover, but doing so will significantly risk the safety of your fire pit. As such, you must only attempt to create your own ignition system if you are trained to handle and install gas systems first.
#1 Marking the Location
Before going any further, you’ll need to mark where your burner is going. A marking spray or chalk will be ideal for this; draw out the shape of the proposed burner design on your floor first to give you a mark to work with. This ensures that you’ll have a basic “template” to work from for the next stages.
#2 Creating a Solid Surface
Once you have marked the location, you may need to create a solid surface with paver – for example, if you are installing your fire pit on grass. The paver base should be roughly two inches thick, and you should use a spirit level while applying the base to ensure that it remains consistently level at all times.
#3 Assembling the Enclosure
Once you’ve marked out the location and shape, you can create the enclosure – i.e., the barrier that holds the burner in place. We recommend a circular ring of hardscape blocks for this. Ensure the blocks are level before continuing to add the next layer; try to position each block above the join between the blocks below for additional stability in your fire pit.
We recommend placing the blocks manually before applying concrete adhesive to ensure that they fit in your design; once you’ve found a suitable design, you can then remove a block, apply masonry adhesive, and then return it to the system to set.
Continue adding more layers until you have achieved the desired height. You can make the enclosure in any shape or style you want, but the height should ideally be around chair height in most cases, and you’ll want to leave a small recess to allow airflow and to feel any cords through.
Adding Ventilation to the System
While creating the enclosure, you will also need to allow an adequate air supply. (Why?)
Remember: fire needs a good supply of air to continue burning, which is best supplied from below the burner.
To achieve this, either leave out a vent block at the base of your burner. Otherwise, if you don’t want to leave a vent hole, you should position the blocks with spacing between each to allow for adequate airflow.
#4 Creating an Ignition System
The most important part in building a gas fire pit is that you should create an ignition system.
There are three different types of ignition systems (match-lit, push-button, and automatic). Match-lit is perhaps the easiest to make, but this can be incredibly dangerous. As such, for the purposes of this guide, we’re looking at installing an automatic ignition system instead.
Before we go further, we must warn here: you should only create your own ignition system if you have the necessary training, tools, and experience in gas systems. If not, call out a professional to install it for you. Make sure to continually test for gas leaks at each connection – we mentioned this earlier about installing the burner and pan.
Choosing an Ignition System
If you have experience in installing gas systems, an automatic ignition system might be a good choice. Electronic or automatic ignition systems require a source of power; for most people, a battery-powered system will be most practical for outdoor use.
An automatic ignition system detects flames through specialist sensors, which makes the system activate while using your fire pit. This also means that the system will cut off automatically when the fire pit is extinguished, providing further safety for your system. This helps reduce the risk of a gas leak occurring in your fire pit.
You will most likely want to use an on/off switch for your automatic ignition system; however, if you purchase a pre-made automatic ignition system, such as in Bluu’s fire pit bowl, fire pit table and round fire pit, you may have greater options to customize this.
How to Install the Automatic Ignition System
To install the automatic ignition system:
First, connect your system to the power supply securely, then connect the system together with the gas valve, which draws gas into the system. Pilot gas is then sent to the surface ignitor, which receives a signal after the power supply is turned on.
The hot surface ignitor must be secured strongly above the plate alongside a jet system that expels gas. Then, when the system is ignited, the gas is passed directly over the hot surface ignition, which causes flames to take hold.
Always Test Each Connection for Gas Regularly
Gas leaks can potentially be fatal if your ignition system does not light. As such, if you have never created an ignition system before, hire a professional to install it instead. You should also always keep a gas detector close to your fire pit at all times to check that gas leaks aren’t putting you at risk while sitting around the burner.
#5 Installing the Burner Pan and Burner
At this point, you’ll now be able to install the burner pan. Some burners come with this pre-attached, but now is the time to add it if yours doesn’t. Remember: the burner pan is where your medium will sit, so it greatly appeals to your new DIY fire pit.
When installing your burner pan, always make sure that the radius is at least three inches wider than the radius of your burner. This allows a stylish finish and reduces the risk of flames spreading to the environment or the people close by to the fire pit. However, extreme caution must always be taken to ensure everyone stays safe while using the fire pit.
Once your burner pan is in place, you can fit the actual burner itself. If you’ve purchased a professional propane burner, this should be incredibly simple; just follow the instructions on the device to secure it to the burner pan, then feed the hose through the hole you left in the side of the enclosure. This will allow you to attach the burner to your propane supply. Only attach the two once you’re completely ready to go, though.
A Word of Caution While Installing Burner Pans and Burners
If you’re creating your own ignition system, this may be a little more complex – we’ll cover that later. However, before you fully set the burner pan and burner in place, make sure that you test for gas leaks at every step of this process. Gas leaks are exceptionally dangerous, and if you notice any gas leaks while creating your burner, you must remove the source of gas and get professional support for your burner immediately.
#6 Adding your Media
Finally, the last finishing touch is to add the media to your fire pit burner pan. Your chosen media could include pebbles, glass beads, lava rocks, and the like; it’s entirely up to you! Be sure that any media you choose is fire-proof and heat-proof, so that you don’t have to worry so much about the media discoloring or melting under the high heat intensity.
For more installation methods, you can watch this video:
Final Thoughts
If you have been planning to build a gas fire pit, you would be in excellent company! Indeed, building a small gas fire pit is not that hard. However, this could save some money on your gas-powered stove, allowing you to create the pit in the way you see fit. Always remember to pay attention to gas using safety.

Leave a comment
This site is protected by hCaptcha and the hCaptcha Privacy Policy and Terms of Service apply.